

Making Dehydrated Pineapple is a very easy way to preserve fresh pineapple by drying so you will have a stockpile of a sweet fresh fruit snack on hand that will last for months. Dried pineapple is one of my favorite food dehydrator recipes.

Dehydrated Pineapple is a sweet treat that you can easily make at home with an inexpensive food dehydrator that will pay for itself in a very short time.
Start with a ripe pineapple for the best results. The sweeter the fresh fruit is the sweeter the dried pineapple will be when the drying process concentrates the natural sugars in the fresh fruit.
Methods of Preserving Fruit
Dehydrating, canning and freezing fresh fruit are three different methods of preserving that can be used to stretch the season of your favorite fresh fruits.
You can save so much money by preserving your favorite fruits and vegetables with a dehydrator.
Dried fruit is a sweet, delicious and healthy snack option. Buying dried fruit can be pretty expensive at the store.
If you make it yourself you can easily save tons of money while taking advantage of the lower prices when the fruit or vegetable is in season.
Scroll down below for the recipe card where you will find the ingredient amounts, directions and for one-click printing or to Pin the recipe.
How to prep pineapple for drying
Preparing a whole fresh pineapple for drying in the dehydrator is very easy. All you need to do is peel it and slice it. Below is how I like to peel and slice a whole pineapple to dry it with my dehydrator.
- Lay the whole pineapple down on its side on a cutting mat or cutting board.
- Use a large sharp knife to cut the top off of the pineapple and discard.
- With the pineapple still on its side cut it in half horizontally.
- Stand one half of the pineapple up on a cut end. Using a sharp knife cut the rough peel off working down along the curve of the pineapple half.
- Trim the pineapple of any "eyes" and discard them. Repeat with the other half of the pineapple
How To Cut a Fresh Pineapple for Dehydrating
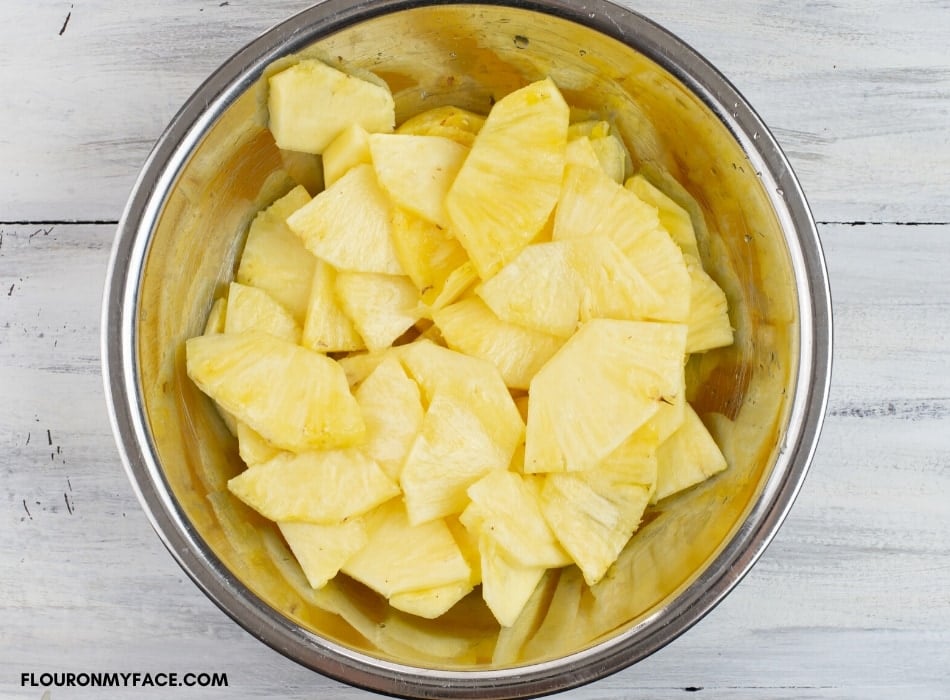
- Cut ¼ inch round slices off the two pineapple halves until you have sliced all of the pineapple into slices.
- Once you have sliced all of the pineapple into ¼ inch slices you will need to cut the sliced pineapple into smaller pieces unless you are dehydrating whole pineapple slices.
- To cut the pineapple into smaller pieces place a pineapple slice down flat on your cutting surface and cut the slice in half. Then cut the half in half so you have 4 pieces of pineapple from the one slice.
- Cut the point off of each quarter piece of pineapple to remove the tough core center.
- Cut each ¼ piece in half again so you are left with a small wedge of pineapple. Put the pineapple pieces into a bowl as you cut each slice into smaller pieces before dehydrating.
- Continue cutting the slices of pineapple until all of the pineapple slices have been cut into smaller pieces.
How to Dehydrate Pineapple
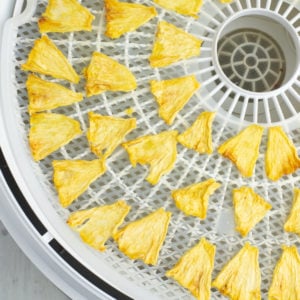
I am using the Nesco Food Dehydrator with stackable trays to dehydrate my pineapple pieces. If you are using another brand of food dehydrator to dry pineapple follow the manufacturer's directions.
- Place the dehydrator base on a stable surface.
- Place the bottom or first tray on top of the dehydrator base and place a plastic mesh liner onto the tray.
- Begin arranging the pieces of pineapple on the first dehydrator tray until it is full. Leave about ½ inch of space between the pineapple pieces and make sure none are touching. If the piece of fruit is touching they may stick together and dry unevenly.
- One large pineapple cut into small pieces will fill 4 trays of the Nesco food dehydrator. Once the trays of the dehydrator are filled or you have run out of fruit place the lid on the top dehydrator tray and plug it in to turn it on.
- It will take about 10 to 12 hours to dehydrate pineapple slices.
- If dehydrating more than one whole pineapple and stacking more than 4 trays on the food dehydrator it will take a few more hours to completely dry fresh pineapple slices. After about 5 hours turn each of the pineapple pieces over to help the pineapple to dry faster and evenly.
- Dehydrate the pineapple slices until they are crisp and dry to the touch.
- Remove pieces of the fruit from the dehydrator as they dry. Some pieces of pineapple will dry faster than others.
- Place the dried pineapple on a paper towel and allow the pineapple to cool to room temperature before storing it in plastic food grade containers, plastic storage bags or glass canning jars.
How to Condition home dried fruits?
The National Center for Home Food Preservation suggests "conditioning" home dried fruits.
To condition your home dehydrated fruits after they have been removed from the food dehydrator and cooled to room temperature store them loosely in a plastic or glass jar.
Cover the jar with a tight-fitting lid. Let the jar or jars stand for 7 to 10 days.
Any excess moisture will be absorbed by the dried pieces of fruit. Shake the jars daily and check for moisture condensation on the inside of the jars.
Using glass canning jars will make spotting any moisture easier.
If any condensation develops return the fruit to the dehydrator for more drying. If any mold is present discard the entire contents of the jar.
Once the dried fruit has been successfully conditioned store the dried fruit in clean, dry canning jars, plastic freezer containers with tight-fitting lids, plastic freezer bags or vacuum seal.
It is a good idea to store the dried fruit in serving size containers to avoid continually opening the container and exposing the dried fruit to air and moisture.
Helpful Dehydrating Tools
Tools I use when I am dehydrating pineapple.


More Dehydrated Fruit Recipes

Email questions or recipe requests to flouronmyface@gmail.com. Follow me on Pinterest, YouTube, Instagram and Facebook.
Dehydrated Pineapple
Ingredients
- 1 large large ripe pineapple (peeled, cored and cut into small pieces)
- water (to rinse)
Instructions
How to prep pineapple for drying
- Wash the outside of the pineapple under cold water.
- Lay the whole pineapple down on its side on a cutting mat or cutting board.
- Use a large sharp knife to cut the top off of the pineapple and discard.
- With the pineapple still on its side cut it in half horizontally. Stand one half of the pineapple up on a cut end. Using a sharp knife cut the rough peel off working down along the curve of the pineapple half.
- Trim the pineapple of any "eyes" and discard them. Repeat with the other half of the pineapple.
How To Cut a Fresh Pineapple for Dehydrating
- Cut ¼ inch round slices off the two pineapple halves until you have sliced all of the pineapple into slices. Once you have sliced all of the pineapple into ¼ inch slices you will need to cut the sliced pineapple into smaller pieces unless you are dehydrating whole pineapple ring slices.
- To cut the pineapple into smaller pieces place a pineapple slice down flat on your cutting surface and cut the slice in half. Then cut the half in half so you have 4 pieces of pineapple from the one slice.
- Cut the point off of each quarter piece of pineapple to remove the tough core center.
- Cut each ¼ piece in half again so you are left with a small wedge of pineapple. Put the pineapple pieces into a bowl as you cut each slice into smaller pieces before dehydrating.
- Repeat and continue cutting the slices of pineapple until all of the pineapple slices have been cut into smaller pieces.
How to Make Dehydrated Pineapple
- Place the dehydrator base on a stable surface. Place the bottom or first tray on top of the dehydrator base and place a plastic mesh liner onto the tray.
- Begin arranging the pieces of pineapple on the first dehydrator tray until it is full. Leave about ½ inch of space between the pineapple pieces and make sure none are touching. If the piece of fruit is touching they may stick together and dry unevenly.
- Once the trays of the dehydrator are filled or you have run out of fruit place the lid on the top dehydrator tray and plug it in to turn it on.
- It will take about 10 to 12 hours to dehydrate pineapple slices.
- After about 5 hours turn each of the pineapple pieces over to help the pineapple to dry faster and evenly. Dehydrate the pineapple slices until they are crisp and dry to the touch.
- Remove pieces of the fruit from the dehydrator as they dry. Some pieces of pineapple will dry faster than others.
- Place the dried pineapple on a paper towel and allow the pineapple to cool to room temperature.
- Store in plastic food grade containers, plastic storage bags or glass canning jars.
Recipe Expert Tips
- One large pineapple cut into small pieces will fill 4 round trays of the Nesco food dehydrator.
- If dehydrating more than one whole pineapple and stacking more than 4 trays on the food dehydrator it will take a few more hours to completely dry fresh pineapple slices.


Anuscke
I'm trying to dry pineapple to use as fuel for my long runs, however, I need to consume a certain amount of carbohydrates per hour. In terms of grams, how much is 1 serving of dried pineapple?
Arlene Mobley
Hi Anuscke it would be the same for fresh pineapple. Hope that helps! Arlene
Luanne Rayvals
I have the Nesco dehydrator and it is really great. I wasn't able to use it for years because I didn't have enough counter space to allocate to it, but I have moved and now am able to use it again as I have enough room for it.
I do have a question: will the pineapple oxidize if I don't dip the slices into water with ascorbic and citric acid? Just checking because I am getting ready to start dehydrating a pineapple soon!
Arlene Mobley
Hi Luanne
Pineapple does not need to be pretreated before dehydrating. You only need to pretreat fruits like apples and bananas that turn brown once you cut them.