• Skip to primary navigation
  • Skip to main content
  • Skip to primary sidebar
  • About Me
  • Shop
  • Privacy Policy
  • Recipe Index
Flour On My Face
  • Home
  • Crock Pot Recipes
  • Easy Freezer Meals
  • Canning Recipes
  • Alfredo Sauce
  • Instant Pot Recipes
menu icon
go to homepage
subscribe
search icon
Homepage link
  • Home
  • About Me
  • Recipe Index
  • Shop
  • Alfredo Sauce
  • Crock Pot Recipes
  • Canning Recipes
  • Easy Freezer Meals
  • Food Dehydrator Recipes
  • Instant Pot Recipes
×
Home » DIY » DIY Mini Cupcake Stands

DIY Mini Cupcake Stands

Published: Jul 20, 2012 · Modified: Aug 4, 2014 by Arlene Mobley · This post contains affiliate links. As an Amazon Associate, I earn from qualifying purchases.

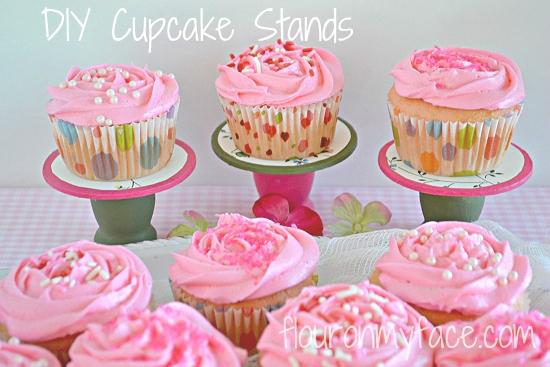
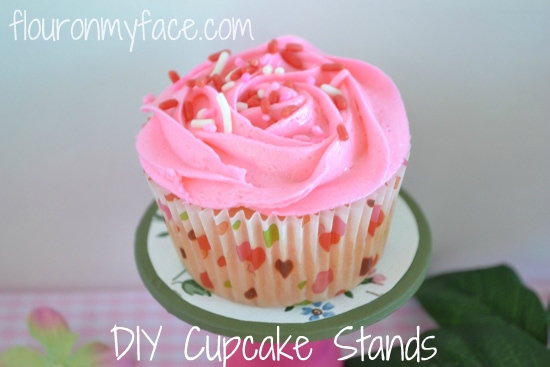
DIY Cupcake Stands

DIY Cupcake Stands

 DIY Mini Cupcake Stands

Pinterest is a wonderful thing. And if your like me you are pinning away not a care in the world. There is no way I could  make or create everything  I have been  saving to my virtual pinboards.

I'm a "collector". Back when I first got on the internet I collected favorites or bookmarks. I had thousands of them. Now I just pin things on Pinterest.

Actually I've made a few things I have pinned. On the percentage scale I've made less then one percent of the things I have pinned!

These DIY mini cupcake pedestals where inspired by a pin.

I had to go hunting the original blog post by Modern Moments Designs and repin it because I couldn't find my original pin.

I could not find the exact mini candle sticks she used. I searched and search all the stores here in town.


Source: modernmomentsdesigns.com via Arlene @ Flour On My Face on
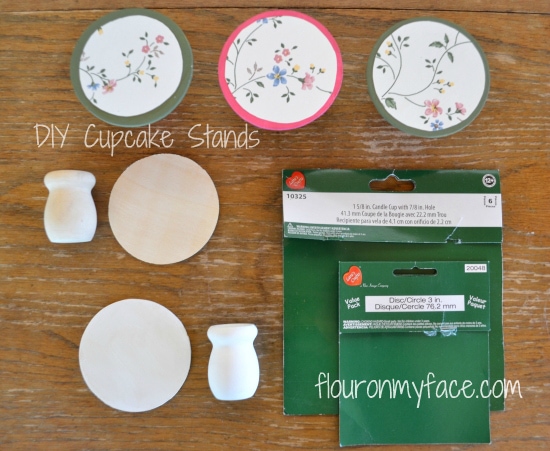
 DIY Cupcake Pedestals

DIY Cupcake Pedestals or Cupcake Stands

Finally I found these mini little 1 ⅝ inch candle cups made by the same company at Michael's craft store.

Since I had been looking for so long and hadn't found the candelabra sticks I decided to go with the candle cups instead. Plus they would work well for a garden tea party I wanted to have for my granddaughters. The shorter candle cup made me think of a mushroom. It was more playful and would be perfect for a little girls tea party. These would also work great for a little girls garden party, butterfly themed party or a fairy themed party.

I never did get a chance to have the tea party and now it is too hot and raining almost everyday. Maybe I'll have a chance to do it in the fall when it cools down and it isn't the rainy season here in Florida.
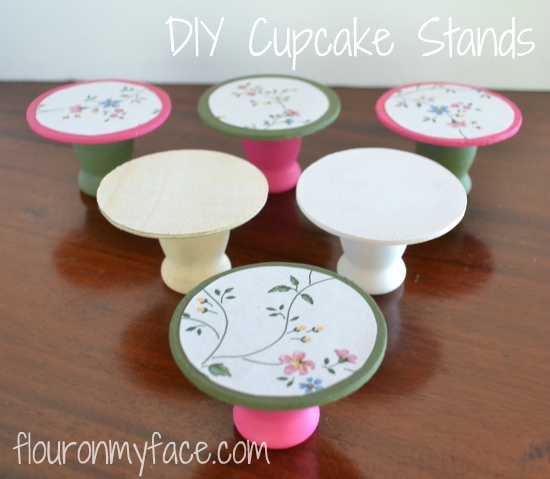
DIY  Cupcake Stands

DIY Cupcake Stands

 To make these mini cupcake stands or cupckae pedestals you will need:

  • 1 package unfinished mini candle sticks or candle cups
  • 1 package of unfinished 3 inch wooden circles/disks
  • gesso, white acrylic paint or spray paint
  • acrylic paint in your choice of colors
  • wallpaper or scrapbook paper in pattern of choice
  • wood glue
  • paper glue
  • a paint brush
  • scissors or a circle cutter
  • wax paper or parchment paper
  • optional: clear varnish

I did things a little differently then the original instructions from the pin. I happen to have lots of acrylic paint on hand because I was very involved in mixed media art before I started my food blog. If you would like to see some of my artwork you can check it out at Altered By Me.
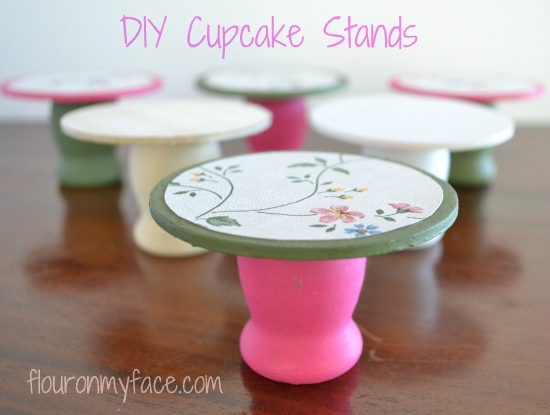
DIY Mini Cupcake Stands

DIY Mini Cupcake Stands

Using spray paint would make the process move along much quicker and cut out the drying time of the acrylic paints but I didn't want to spend the money on spray paint when I literally have buckets full of acrylic paints in many different colors on hand. Acrylic paint is so much cheaper then a can of good spray paint so if you don't have any laying around the house like I do and you want to cut costs go with the acrylic paint.

It's cheaper,  safer and less messy to use then spray paint.

  1. Step One:  Sand the rough edges off the wooden circles and wipe the dust off with a soft cloth. No sandpaper on hand? Use an emory board.
  2. Step Two:  Using the gesso or white acrylic paint give all your wooden pieces a couple of base coats. This is what gives you a nice smooth and even surface when you use acrylic paints. It covers all of the wood grain and gives you a nice smooth surface to paint on. Set the wet pieces on a piece of wax paper or parchment paper to dry. Let air dry completely between coats or use a heat gun if you happen to have one. The wax or parchment paper will not stick to the paint as it dries and when the pieces are completely dry just pull the wax/parchment paper off the pieces. It won't pull any of the paint off and damage your pieces.
  3. Step Three: Once the base coats are dry paint the candle cups and wooden circles the colors you have decided on. I decided to go with two different colors, one for the bottom and a different color for the top. Depending on the brand of paint your using you may have to paint two or more coats. I love Americana brand of acrylic paints. This brand is a tiny bit more expensive but worth it because it is so thick and creamy that one coat will do it in most cases. Place the wet pieces on the wax or parchment paper to dry.
  4. Step Four: Cut a circle out of a piece of recycled  wallpaper or a pretty piece of scrapbook paper. I had some old wallpaper books on hand so I used wallpaper but you could also use scrapbook paper. If you decide to go with the scrapbook paper I suggest you use a clear varnish coat on top to protect the paper from any cupcake crumbs or frosting that might fall on the paper. That's why I went with the wallpaper I had on hand. Wallpaper will make clean up easier since it is safe to wipe it off with a damp sponge without damaging it. Glue the wallpaper or scrapbook paper to the center of the wooden circle with a good all purpose white glue. Let the glue dry.
  5. Step Five: Center the wooden candle cup on the bottom of the painted wooden circle. I eyeballed it. Run a thin bead of glue around the edge of the candle cup. Join the two pieces. Wipe off any excess glue from around the edges with a damp cloth, paper towel or baby wipe. Set the top side of the cupcake stand upside down  on a level surface to dry. Allow the wood glue to dry for 24-48 hours.
DIY Mini Cupcake Stand

DIY Mini Cupcake Stand


Have you made or created something you have pinned on Pinterest and posted it to your blog?

Happy Pinning!

« Lemon Verbena Sweet Tea
Chocolate Covered Cherries Cake Pops »
  • Tweet
  • Yummly
  • Mix
  • Share
  • Email

About Arlene Mobley

Arlene Mobley author of Flour On My Face-a Food & Lifestyle website helping busy families get dinner on the table by serving easy recipes every week.

Reader Interactions

Comments

  1. Jane Sutton

    January 14, 2015 at 5:20 pm

    These are beyond adorable. If you want your base to be taller, you could glue two together. I've got to try this! Thanks so much.

    Reply
    • Arlene Mobley

      January 16, 2015 at 1:38 pm

      Jane

      Thank you. That is a great idea!

      Reply
  2. Jen@smallroomideas

    August 12, 2013 at 7:47 am

    These mini cupcake stands are so cute! These would be so perfect for children's parties! Thanks!

    Reply
    • Flour On My Face

      August 12, 2013 at 12:17 pm

      Jen

      Thank you!

      Reply
  3. michelle

    July 23, 2012 at 9:45 pm

    These look perfect, so cute for a party!
    Subscribed so that even without Buzz, I won't miss a post!

    Reply
    • Flour On My Face

      July 23, 2012 at 11:26 pm

      Michelle

      Thank you and thanks for subscribing!

      Reply
  4. Theresa @DearCreatives

    July 23, 2012 at 2:24 pm

    I just love the cupcake stands!! We are the biggest cupcake makers ever. I just might have to pin yours & make them! Thanks for the inspiration & link-up fun! Feel free to pop by anytime!
    Theresa 😉

    Reply
    • Flour On My Face

      July 23, 2012 at 2:53 pm

      Theresa They are really easy to make. The hardest part for me was finding the wooden candle cup.

      Reply
  5. Laura @ Family Spice

    July 21, 2012 at 1:56 pm

    Those are so darn cute!!!!!!! My daughter would love them for her tea parties! I'm pinning YOUR cupcake stands - Love it!

    Reply
    • Flour On My Face

      July 22, 2012 at 11:46 pm

      Laura Thank you! They are perfect for a tea party!

      Reply
  6. Minnie(thelady8home)

    July 21, 2012 at 1:14 pm

    Wow!! So so creative! Love the idea!! Thanks so much.

    Reply
  7. Heather@girlichef

    July 20, 2012 at 1:33 pm

    These are adorable - what a fun idea! I used to be the same way about hoarding bookmarks. That's truly something I love about Pinterest - I can actually FIND the things I've saved. 😉

    Reply
    • Flour On My Face

      July 20, 2012 at 9:55 pm

      Thanks so much Heather.

      Reply

Leave a Reply Cancel reply

Your email address will not be published. Required fields are marked *

Recipe Rating


This site uses Akismet to reduce spam. Learn how your comment data is processed.

Primary Sidebar

Arlene Mobley Food & Lifestyle Blogger


Hi, I'm Arlene Mobley the cook & photographer here at Flour On My Face. I love helping busy families get dinner on the table. Learn more here

social social social social social

We Have Been Featured In

Flour On My Featured In Image

Todays Popular Recipes

4th of July Recipes

Pomegranate Fruit Salad served in a half watermelon.

Fresh Fruit Pomegranate Salad

A Creamy Pea and Pasta Salad recipe in a white serving bowl on a plate with green trim

Creamy Pea Pasta Salad Recipe

A serving of Hibiscus lemonade in a glass with lemon slice and mint sprig garnish.

Hibiscus Lemonade

Crock Pot Pulled Chicken Sandwich with sliced pickles and jalapeno peppers on a bun.

Crock Pot BBQ Pulled Chicken (5 ingredients)

Country style pork rib covered in pork rub.

Sweet and Spicy Pork Rub

Pink Dessert Salad topped with whipped cream and a cherry in a bowl.

Old Fashioned Pink Salad Recipe

More 4th of July Recipes;

Canning

Canning jar full of pickled green tomatoes with herbs, spices and fresh garlic cloves

Quick Pickled Green Tomatoes Recipe

Homemade Orange Curd recipe via flouronmyface.com

How to Make Orange Curd

Calamondin Marmalade on cream cheese and crackers.

Calamondin Orange Marmalade

Ball Blue Book favorite canning recipes via flouronmyface.com

Ball Blue Book Guide to Preserving Recipes

A stack of canning jars filled with sweet and spicy peach jalapeno jam.

Peach and Jalapeno Jam

Strawberry Shortcake made with homemade strawberry pie filling

Strawberry Pie Filling Recipe

More Canning Recipes;

Drinks

Coconut Mojito in a glass with mint and lime wedge.

Coconut Mojito

Mason jars filled with Watermelon Thyme Lemonade.

Watermelon Thyme Lemonade

A serving of Hibiscus lemonade in a glass with lemon slice and mint sprig garnish.

Hibiscus Lemonade

Homemade Cherry Limeade is a perfect Summer drink recipe to cool over when the heat starts to climb.

Summer Drink Recipes Easy Cherry Limeade

More Drinks;

Food Preserving

Overhead photo of dehydrated oregano in a spice bottle on a napkin with a white mortar and pestle in the background.

How to Dehydrate Oregano

How To Dehydrate Parsley

A bowl filled with pitted cherries.

Best Cherry Pitter for Pitting Fresh Cherries

Closeup photo of a half pint mason jar filled with refrigerator garlic dill pickles.

How to Make Refrigerator Garlic Dill Pickles

More Food Preserving;

Herbs

10 Great Ways to preserve fresh herbs via flouronmyface.com

10 Great Ways To Preserve Herbs

Tall glasses filled with Pineapple Sage Mojito cocktail on a serving tray with fresh pineapple and fresh mint.

Sweet Summer Pineapple Sage Mojito recipe

Blood Orange Thyme Paloma served in a tall glass with a sprig of thyme garnish.

Blood Orange Thyme Paloma Cocktail

Crock Pot Garlic Herb Chicken recipe via flouronmyface.com

Crock Pot Garlic Herb Chicken

More Herb Recipes;

Pasta Salad Recipes

Kraft Zesty Garden Pasta Salad

Italian Garden Pasta Salad Recipe

Glass bowl filled with broccoli and tomato pasta salad.

Broccoli and Tomato Pasta Salad

pasta salad recipe, sour cream pasta salad recipe, sour cream cheddar pasta salad

Sour Cream Cheddar Pasta Salad

Pasta Medley Salad Recipe

More Pasta Salads;

Freezer Meals

Freezer Meal Crock Pot Chicken Chili Mac ingredients in a freezer bag.

Freezer Meals-Crock Pot Chicken Chili Mac

Freezer Meal Cheesy Cauliflower Soup recipe via flouronmyface.com

Easy Freezer Meal-Cheesy Cauliflower Soup

How to freeze cookie dough so you can get a jump start on your Christmas sugar cookie baking this holiday baking season via flouronmyface.com

How to Freeze Cookie Dough

Freezer Meals Crock Pot Pineapple Pulled Pork Recipe using the FoodSaver Vacuum sealer

Freezer Meals Crock Pot Pineapple Pulled Pork

More Freezer Meals;

Crock Pot Recipes

Crock Pot Chipotle Pulled Chicken

Crock Pot Raspberry Chipotle Pulled Chicken

Crock Pot Rosemary Chicken recipe served on a white glass platter with baby red potatoes.

Moist & Tender Crock Pot Rosemary Chicken

A dessert bowl with caramel apple cake and two scoops of vanilla ice cream.

Crock Pot Caramel Apple Cake

Sweet and Sour Pork with a mound of white rice served in a shallow teal colored bowl.

Crock Pot Sweet and Sour Pork

Chicken and roasted sweet potato soup in a blue and brown soup bowl.

Crock Pot Chicken Roasted Sweet Potato Soup

A bowl filled with noodles topped with creamy beef stroganoff.

Crock Pot Beef Stroganoff

More Crock Pot Recipes;

Instant Pot Recipes

Honey garlic pork loin served on a dinner plate with potatoes and asparagus.

Instant Pot Honey Garlic Pork Tender Loin

A bowl filled with beef barley soup with a rich and thick broth.

Instant Pot Beef Barley Soup Quick and Delicious

Pressure cooked black eyed peas in a bowl.

Instant Pot Black-Eyed Peas Recipe

I bought an Instant Pot Electric Pressure Cooker. Now what?

I Bought An Instant Pot Pressure Cooker

A bowl of creamy cauliflower and broccoli soup.

Instant Pot Cauliflower Broccoli Soup Recipe

Uncooked red potatoes inside an Instant Pot before pressure cooking.

Instant Pot Red Potatoes

More Instant Pot Recipes

Footer

↑ back to top

About

  • Privacy Policy

Newsletter

  • Sign Up! for emails and updates

Contact

  • Contact

Flour On My Face is a participant in the Amazon Services LLC Associates Program, an affiliate advertising program designed to provide a means for us to earn fees by linking to Amazon.com and affiliated sites.

Copyright ©2022 Flour On My Face

117 shares