

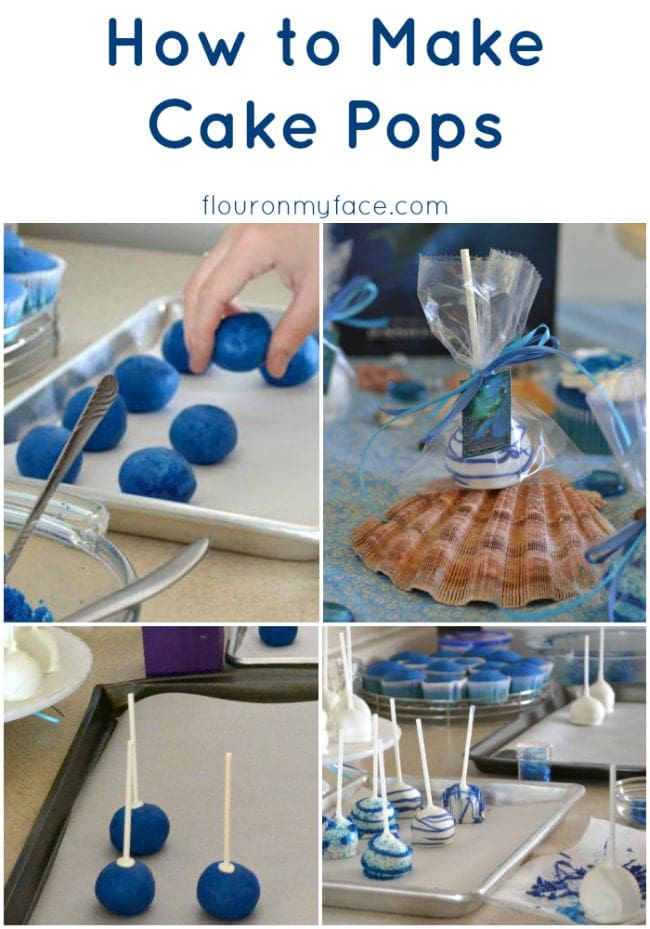
How to Make Cake Pops
This How to Make Cake Pops post has been in the making for a few years now. Back in 2011 I made cake pops for the first time. The road to cake pop bliss was literally a bumpy one. It took a couple of dozen tries before I could get them coated with a smooth candy coating and not fall off the stick.
I can still remember the ugly lumpy cake pops I made back then. I finally figured out the trick just in time to make some red velvet cake pops for my granddaughter Addison's first birthday party. After that party I wrote Cakeball Pops and The Secret To Dipping Anything in Chocolate.
That earlier post on the Secret to Dipping Anything in Chocolate only included a not very good photo of the finished cake pops along with the written directions on how to make cake pops.
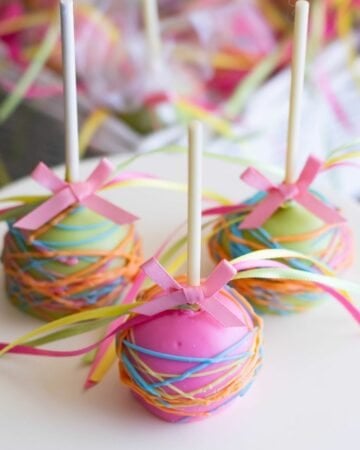
Now here we are five years later and I have made literally hundreds of cake pops since then. I have made rainbow cake pops for a Lisa Frank birthday party and cake pops for a Lion King baby shower.
I've made Cake Pops for the Disney young adult book release of Deep Blue Waterfire Saga by Jennifer Donnelly , I even made Chocolate Covered Cherries Cake Pops for a Renuzit air freshener challenge. I've made them many more times than I have shared them on this blog.
I've learned a few Cake Pop tricks along the way. I know how hard it was for me when I first started making cake pops so I figured some of you might appreciate seeing a more detailed post of the process.

Cake Pop Supplies Needed
- 1 box cake mix plus ingredients to make
- 1 can of frosting, I like to use cream cheese but use whatever flavor you like
- Wilton Lollipop Sticks
- 1-2 bags Wilton Candy Melts in color of choice
- Wilton cellophane treat bags
- Crisco solid shortening
- 2 cookie sheets
- parchment paper
- a container for melting and dipping the cake pops
- Cake Pop stand or foam block covered with aluminum
Step by step directions to make Cake Pops
The first thing you're going to do is bake a cake following the directions on the box. You can make any flavor you like. Bake the cake following the directions. Bake it in a 9 x 13 pan or two 8 inch round cake pans. Cool the cake completely. Once the cake is cool run a sharp knife through it to cut it into sections. Dump the entire cake in a very large bowl.
In the photos below I am working with one 8 inch cake pan (half a cake recipe) instead of the entire cake recipe because as you can see in the background I have already made some of the cake pops.
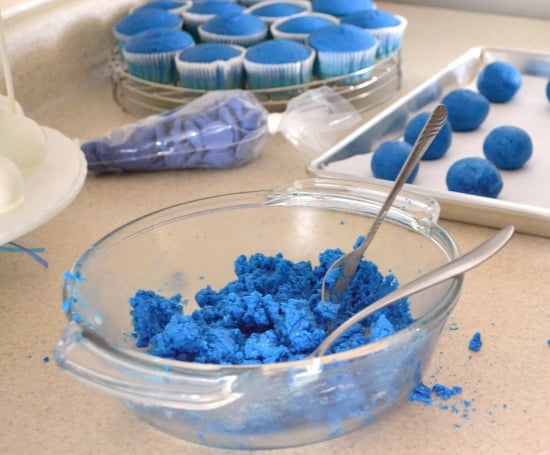
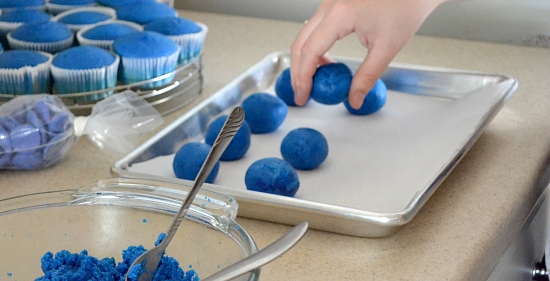
Use a spatula, fork, wooden spoon or even your hands to crumble the cake completely. You want fine crumbs with no lumps. For me a fork works best.
Once the cake has been reduced to crumbs add about 2 heaping tablespoons of frosting to the bowl. Mix the frosting in well. Add another tablespoon of frosting to the bowl and mix it in.Repeat until all of the cake crumbs are moistened with frosting.
If you still can see pieces of dry cake as you are mixing break them up with the fork and mix until you no longer see them.
How to make Cake Pops Tip #1
More is not better when making cake pops. You want the cake pop "dough" to just hold together. You do not want it too moist. I know there are many cake pops recipes out there that call for an entire can of frosting. Trust me you want the cake pops balls to hold their shape. You do not want them too moist or the weight of the candy coating will cause the cake pop balls to fall off the lollipop stick.
Some cakes are drier than others so the amount of frosting needed will vary from batch to batch.
How to make Cake Pops Tip #2
Once you have enough frosting mixed in and you do not see any more dry pieces of cake you are ready to form the cake pop balls. What I do is scoop some of the cake and frosting mixture up with a teaspoon or a small dough scoop and roll a ball.
If the cake pop ball is too big I pinch some off and roll it again. Then I will adjust the amount of cake pop dough for the next scoop. This is when a dough scoop really makes things easy. By using a dough scoop your cake pops will all be the same size.
How to make Cake Pops Tip #3
You do not want the cake balls to be too big. If they are too big the weight from the cake, frosting mixture, and chocolate coating will cause them to slide down the lollipop stick ruining your cake pop.

From one box of cake mix you should get about 36-48 cake balls, depending on how big you made the cake pop balls. Have a cookie sheet covered with parchment paper nearby. As you form the cake balls place them on the cookie sheet in a single layer.
When you have filled the cookie sheet with cake pop balls place the tray into the freezer until the cake balls have firmed up, about 15 minutes.
How to Melt Wilton Candy Melts
After the cake pop balls are in the freezer for about 10 minutes begin melting the candy melts in a small cup that is narrow and tall. I have used a child's sippy cup many times. I have found this to work better than a bowl.
If you don't have a sippy cup any container that is about the same size will work. I now have a Wilton Melting cup that is the perfect size and depth. You could recycle an 8 oz sour cream container if you don't have any sippy cups or a Wilton Melting cup.
- Fill the cup or container with half the bag of candy melts.
- Add 1 tablespoon of Crisco to the cup.
- Place the cup in a microwave and heat for 20 seconds.
- Take a peek to see if they candy melts have started to melt and stir them.
- Return to the microwave and heat for 15 seconds and stir.
- Return to the microwave and heat for 10 seconds.
- By now the candy melts should be almost completely melted. This is the critical point in the melting.
- Stir the candy melts. If they are extremely thick add about ¼ teaspoon of crisco and heat another 10 seconds. Stir and check for lumps. You may see tiny lumps of either unmelted candy melts or the Crisco you just added.
- Continue heating the candy melts at about 5 seconds until they are completly melted and no lumps remain.
- Candy melts are done when all lumps are gone and they are thin enough that the melted candy coating will run off the edge of a spoon.
How to insert Lollipop sticks into Cake Pops
Gently pick up a cake pop ball in your left hand. With your right hand pick up a lollipop stick. Dip the tip of the lollipop stick into the melted candy coating about ½ inch.
Insert the stick to the center of the cake pop.
Place the cake pop down on the cookie sheet, cake ball down. If you want a smooth round cake pop you will need to make or purchase a cake pop stand.
H0w to make Cake Pops Tip #4
Why I make upside down cake pops. Over the years I have learned that I like making my cake pops so they a free standing. By dipping and letting the candy coating harden in the upside down position the harden candy melts create a base that makes serving them so much easier.
No need to worry about how to present them this way. You can arrange them on a pretty cake stand or plate this way where if they were made the other way you need to serve them with the stick down in a cup or other container that will keep the round cake pop ball from gettin damaged.
I always wrap my cake pops in a Wilton plastic treat bag and tie a pretty ribbon around the stick. This protects that cake pop and keeps it fresh.
How to dip Cake Pops Tip #5
Pick a cake pop up by the stick.
Dip it into the melted candy melts to just below the stick, rotate to cover all sides with the melted candy coating.
Slowly lift the cake pop out of the melted candy coating and twirl the stick between your fingers, gently tapping the stick on the side of the dipping container to allow excess candy coating to run off.
Place on a cookie sheet, that has been lined with parchment paper cakeball down.
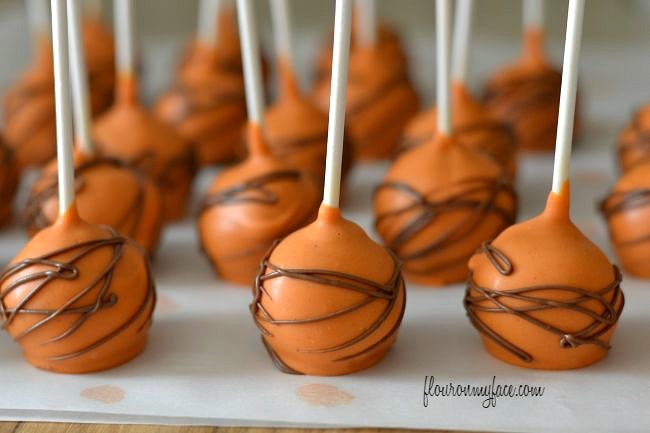
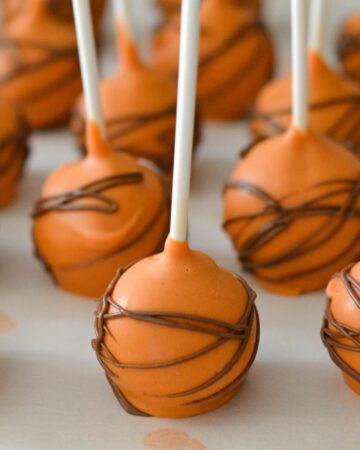
The above photo is a picture of how I stand my cake pops and allow them to harden. In the photo, they have hardened and I have decorated them with a drizzle of chocolate. I wanted to show you an example of what I mean when I say I make upside down cake pops.
These are Pumpkin Spice Cake Pops that I made for a Fall Baby Shower last year. The recipe is not on my blog yet.
How to serve Cake Pops at a Party Tip #6
Once the candy coating has hardened you can serve them as is or melt a contrasting color of candy coating and decorate them by drizzling the candy coating over each cake pop.
If serving them for a party wrap them in a cellophane treat bag and tie a ribbon around the stick.
It makes a beautiful presentation when the cake pops are served on a pretty cake stand or plate.
Can you freeze Cake Pops? Tip #7
Yes, you can form the cake balls in advance and freeze them. This works well when you are making cake pops in advance for a special occasion. Freeze the cake balls after forming them on the cookie sheet then place them in a single layer in a plastic container. Place a piece of parchment paper between the layers to keep them from sticking together.
Thaw before dipping in the candy coating. The cake pops should be cool to the touch, not frozen. Dipping semi-frozen cake pops into warm melted candy melts will cause cracks to appear as the candy coating hardens.
You can also freeze the finished cake pops. Follow all the step above, wrap the cake pops in a cellophane wrapper then lay the wrapped cake pops on their side in an airtight container.
Unlike the unfinished cake pops, you can stack as many cake pops on top of each other as will fit in the container. The cellophane wrapper will protect the cake pops from damage.
To thaw; remove the container from the freezer and place on the counter unopened for 1-2 hours before serving. Leaving them in the container to thaw helps prevent a sudden change in temperature and prevents moisture from forming on the cake pops as they thaw.
How to make Cake Pops
Equipment
- Wilton cellophane treat bags
- Container for melting and dipping the cake pops
- Cake Pop stand or foam block covered with aluminum
Ingredients
- 1 box cake mix plus ingredients to make
- 1 tub cream cheese frosting
- 2 bags Wilton Candy Melts in color of choice
- 2 tablespoons Crisco solid shortening ((amount will vary))
Instructions
- See the extensive step by step directions with photos is the blog post.
- Bake the cake following the directions on the box.
- Cool the cake completely.
- In a large bowl crumble the cooled cake until you have fine crumbs.
- Add one or two tablespoons of frosting to the crumbled cake. Start mixing the frosting in to the crumbs. Slow add a tablespoon of frosting at a time until the cake crumbs will hold shape when you squeeze a handful.
- Roll the cake into balls and place on a cookie sheet.
- Chill the cake balls 15 minutes or until firm.
- Melt a small amount of candy melts in a small bowl.
- Remove the cake balls from the refrigerator. Dip the end of a lollipop stick in the melted candy coating and push the stick into a cakeball. Place the cake pop bake on the cookie sheet. Repeat until all cake pops have a stick inserted. Allow the candy coating to harden.
- Melt the remaining candy coating in a dipping bowl.
- Dip each individual cake pop in the melted candy coating. Allow the excess to run off back into the bowl
- Stand the dipped cake pop in a cake pop stand or back on the cookie sheet.
- Allow the candy coated to harden completely.
- Decorate with more melted candy in a swirl patter.
Nutrition


Anna
How do you get your cake pops that blue color? How is the actual cake blue? Plz help!!
Arlene Mobley
Hi Anna
I used 2 envelopes of Pillsbury Aqua Blue Funfetti Cake mix (affiliate links) https://amzn.to/2v97yXv for the cake and ( https://amzn.to/2Ax3TIi ) Wilton Royal Blue Candy Melts for the candy coating. You'll need 2 to 3 bags of candy melts to make about 36 to 48 cake pops.
Anna
Thank you so much!!
Arlene Mobley
Anna
Your welcome!
Jennifer
If using paramount crystals, would you sub the same amount for what you did in Crisco? Thanks!!
Marcella
For the first time in my life my cake pops came out a success, I followed every step of your tips.
Thank you!!
Arlene Mobley
Marcella
I am so happy to hear that! It took me a few batches of cake pops before I figured out how to melt and dip them so they turned out nice and smooth. I'm sure you noticed I use way less frosting in the cake crumbs. My cake pops turn out perfect every time making them this way.
Mandy Tomlinson
What is Crisco please
Arlene Mobley
Crisco is a brand of solid vegetable shortening. You can find it in most stores on the aisle with cooking oil.
Mary
Your cake pop tips are amazing. Thank you for sharing them.
Arlene Mobley
Mary
Thank you!
Vicky
I have a problem of the cake pop falling apart or off the stick. Can you help ?
Arlene Mobley
Vickie
Are they too moist or too dry? Are they falling apart when you are first inserting the stick or after you dip them? How much frosting are you mixing in to the cake crumbs? What candy coating are you using? Is it thin enough when you are dipping?
Noa Ambar Regev
I love that you can make the cake pops in many color combinations for different party themes. I especially liked the orange and brown ones on the last photo. I know you wrote these are for Fall, but with these colors they could work really great for a Basketball Party too 🙂 (pinned!)
Arlene Mobley
Noa
Thank you. Your right the brown and orange cake pops would be perfect for basketball season.
Nichole aka CuppaGeek
I always seem to eat them when they are ready to go in the freeze and forget that I need to save them for the kids! I want to try making these with various coffees and teas that I have.
Arlene Mobley
Ha ha Nicole Cake Pop balls are so tempting. I usually have to guard them from the kids or they would eat half of them before I dipped them.
Mich Charles
Thanks for this memo you came up with. Quick a question , the blue cake balls presented here what recipe did you use?
Arlene Mobley
The recipe is in the post. Thanks for stopping by!
Allison @ Frugal on the Prairie
Cake pops have always been my weakness..I can't make them at ALL, that is! But your post is so clear and easy to follow that I just might find success.:)
Arlene Mobley
Allison
Thank you. I hope you get a chance to try making cake pops again!