How to Create a Hydroponic Window Farm
When I first heard of a hydroponic window farm, I balked at the idea, just because of how scientific it sounded. But really, the purpose of this type of garden is to grow a lot of green, with a small amount of water. A Hydroponic Window Farm isn't as difficult as it sounds and I am going to show you How to Create a Hydroponic Window Farm of your very own.
Why would you want a window farm?
Have you ever longed for some nature in your tiny downtown apartment? Do you like the smell of fresh flowers? And perhaps most importantly, are you ready to take your cooking to the next level? Fresh greens and homemade pesto for a fraction of the cost are possible every single day when you have a window farm. Plants also liven up small spaces and can even improve your health.
How to Create a Hydroponic Window Farm
When you make a window farm, you can enjoy fresh greens and herbs year round. Using hydroponic methods will allow you to use as little as 10% of the water required by plants grown in soil and achieve higher yields, which is important when you are working with a small space like a windowsill. Hydroponics also allow you to grow plants without dirt, so you don't have to worry about bringing a little too much nature into your kitchen.
What You Need to Create a Basic Window Farm
- The location: A window with a lot of sunlight.
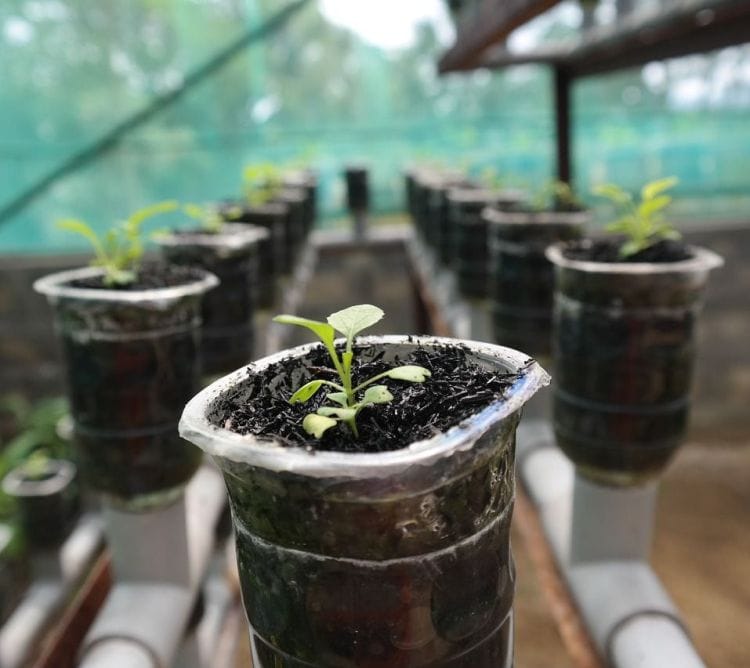
- Pots or bottles: An old 1.5-liter plastic water bottle is ideal for this purpose.
- A net cup: This can be as simple as a Dixie cup with a bunch of holes poked into the sides. It will need to fit inside of the plastic water bottle and will be where the plant rests.
- Liquid soil: This is a commercially available mixture that contains all of the nutrients needed by plants to grow strong and healthy. If you are a hardcore gardener, you could DIY this with compost and a few more ingredients.
- Clay pellets or stones and gravel: You need this to keep the soil aerated and prevent root rot.
- Seeds or seedlings: Buy some of your favorites! You can even purchase them online if they're not available in your area. It is easy to start growing seeds into seedlings on a damp sponge.
The Design
Source: How to Build a Reservoir System Window Farm

The Basic Setup:
This design may seem complicated, but it is completely possible to pare it down! You can use as little as the bottle setup on the left in order to grow a few plants. The additional reservoirs at the top and bottom of the device help achieve higher efficiency and yields, but I suggest starting simple and working your way up to this after you have a few plants going already.
- Cut a hole in the side of your 1.5-liter plastic water bottle, as shown in the diagram.
- Fill a net cup with clay beads - or chunks of gravel - and carefully place it inside the plastic bottle.
- Puncture a hole at the bottom of the water bottle cap. You can place a piece of drip tubing at the end of this cap, or simply place a dish underneath the suspended water bottle in order to catch the water and runoff from the plant.
- Then, take a piece of wire or twine, wrap it around the top of the water bottle and suspend it from the top of a sunny windowsill. That's it!
Setting Up Your Space
Ideally, your system should be set up in a large and sunny windowsill. If your home currently has curtains or blinds in the windows, consider moving your window farm to an unobstructed window in your house, such as the garage. There, you can group your system in a window or make use of wall space to arrange your farm near a door or window.
If you're a fan of organizing your garage by categorization, this can be especially helpful since you probably already store gardening materials such as fertilizer or seeds nearby.
Planting
If you grew a seedling from a seed on a sponge, all you need to do is carefully place the seedling on top of gravel set in a net cup. If you purchased seedlings, you will need to shake off the dirt completely and then place them on top of the gravel in your net cup. It also helps to keep the plant in a dark place for a few days so that the roots will develop and recover from transplant shock.
The Growing Process
Water your plant and add the recommended quantity of liquid soil every day if you are using the basic setup - rather than the full reservoir system, in which case you would only need to water and add nutrients every five to seven days. For most plants, you will start to see growth within a few weeks!
As you can see, starting a hydroponic window farm is simple and comes at a low cost. Small amounts of water and liquid soil translate to big gains in vegetables - you can now have completely organic kale, strawberries and basil on demand and straight from your windowsill.
Megan Wild loves making the most out of a small space. She enjoys finding new ways to make use of unusual spaces in her home. Find her tweeting home inspiration @Megan_Wild.







Leave a Reply