

Disclosure: This post has been sponsored by Airheads. All thoughts and opinions are my own.
Make this fun Airheads Advent Calendar this Christmas season.
The kids will have so much fun making DIY Airheads Candy Ornaments and every day leading up to Christmas Eve they can eat one of their DIY Airheads Candy Ornaments.

If I took my kids or grandkids to a candy store and they could only pick one candy to buy they would all come to me with a handful of Airheads. They all love the long lasting fruity flavor of Airheads.
If you love easy & amazing recipes join the Flour On My Face Newsletter and get each of my new recipes delivered right to your inbox.
They each have their favorite flavor of Airheads. Blue Raspberry and Cherry Airheads seem to be the winning Airheads flavors with my bunch. Me, I like a little mystery in my life so the White Mystery Airheads flavor is my favorite

I love to craft with the kids during the holiday season. Each December they look forward to an Advent Calendar. It always gets them excited while they count down the days until Christmas Eve.
Scroll down below for the printable instruction card where you will find the directions and for one-click printing or to Pin the recipe.
Since the kids love to stretch and mold Airheads while they are eating them….I had a great idea.
I thought to myself; I bet Airheads would be easy to use in a fun Christmas candy crafting project.
I have a huge stash of cookie cutters in all shapes and sizes so I thought I would make some mini Airheads candy ornaments and turn them into a fun Airheads Advent Calendar that I knew the kids would love.
What kid wouldn't love eating a piece of Airheads candy every day during the month of December?
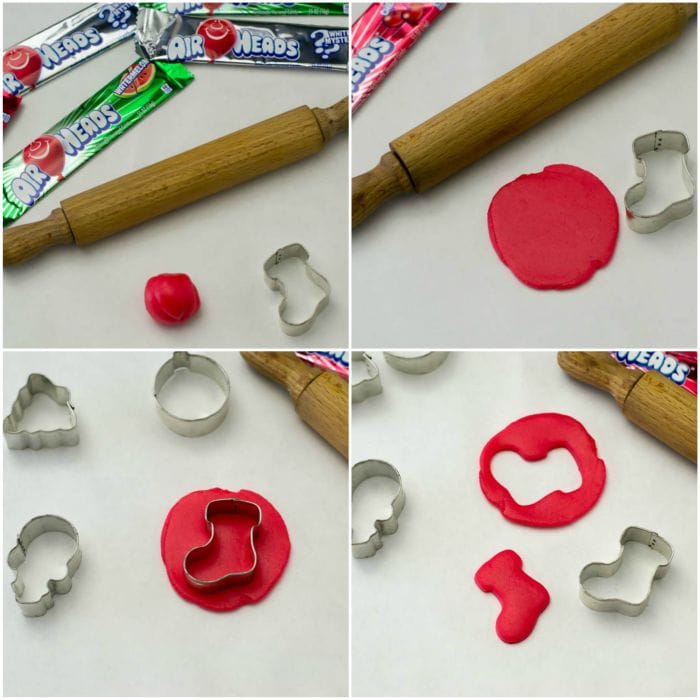
Step one: Roll out the Airheads and cut out an ornament shape with a cookie cutter.
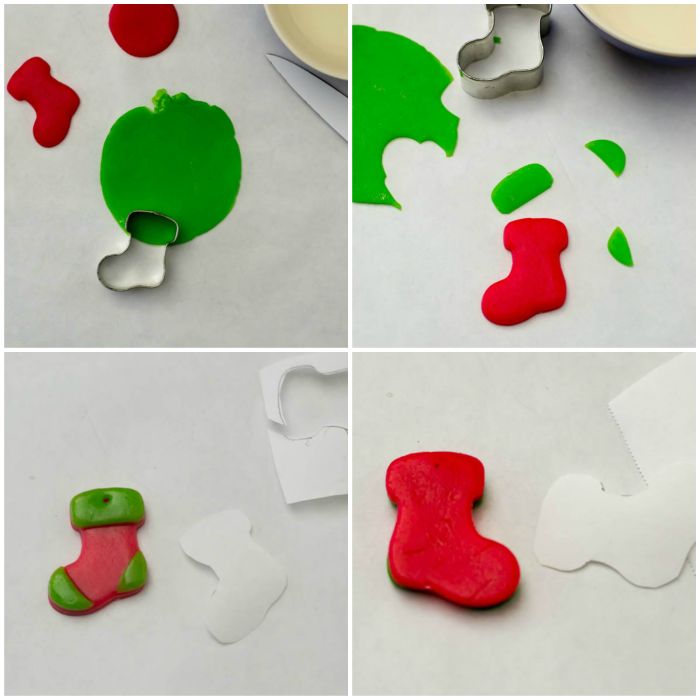
Step two: Decorate the Airheads candy ornament and back it with a piece of freezer paper.
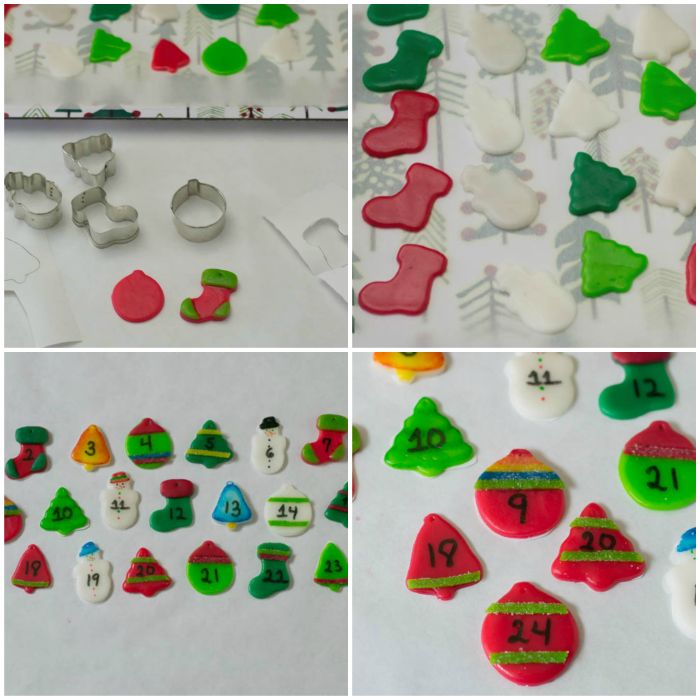
Step three: Write the numbers 1-24 on the Airheads candy ornament with an edible ink marker.
Step four: Hang an ornament hook on each Airheads candy ornament and hang from a twig tree or mini artificial Christmas tree.

How to make an Airheads Advent Calendar
Supplies
- Airheads in Mystery White, Green Apple, Watermelon and Cherry
- Airheads Xtremes (optional)
- 2 inch Mini Cookie Cutters
- Black Edible Marker
- Christmas Ornament hooks
- Freezer paper
- Water
- Twig Tree or other small artificial Christmas tree
- Rolling pin
- Scissors
- Embroidery needle or wooden skewer
Directions
- Warm your choice of flavor Airheads in the palm of your hand rolling it into a ball.
- Flatten the ball with a wooden rolling pin and roll it until your mini ornament will fit over the flattened piece of Airheads candy.
- Press the metal cookie cutter into the candy until it cuts through to the back.
- Gently push the shape through the cookie cutter and set aside on a piece of freezer paper.
- Repeat once or twice more with the remaining piece of Airheads.
- Cut 24 mini Airheads candy ornaments.
- Push a thick embroidery needle or wooden skewer through the top of each ornament to make a very small hole so the ornament can be hung with an ornament hook.
- Cut pieces of contrasting colored Airheads to decorate each Airheads ornament.
- Embellish with strips of Airheads Xtremes if desired.
- Trace each cookie cutter shape on a piece of freezer paper. You will need one freezer paper shape for each ornament made.
- Dampen the back of each Airheads ornament with a finger dipped in water.
- Place a freezer paper cut out that corresponds with the ornament shape, shiny side down on the back of the ornament. Trim if needed. Set ornament down on another piece of freezer paper to air dry. Repeat for each ornament. Allow to air dry a couple of hours or overnight.
- Using the Black Edible Ink marker write a number on each ornament starting with number 1 and ending with number 24. Allow ink to dry before handling.
- Push an ornament hook through the hole at the top of each ornament. Repeat with all the remaining ornaments.
- Hang your Airhead Advent Ornaments from a twig tree or mini artificial Christmas tree.
- Enjoy each corresponding numbered ornament starting with number one of the 1st day of December to count down the days until Christmas Eve.
Notes: The freezer paper backing is used to keep the Airheads ornament from stretching while it is hanging on the tree. This step is very important and will ensure that your Airheads candy ornaments will continue to hang without stretching during the entire 24 days of December.

Airheads Advent Calendar
Equipment
- Black Edible Marker
- 2 Inch Mini Cookie Cutters
- Christmas Ornament hooks
- Freezer paper
- Twig Tree or other small artificial Christmas tree
- Rolling Pin
- Scissors
- Embroidery needle or wooden skewer
Ingredients
- 1 package Airheads in Mystery White (Green Apple, Watermelon and Cherry)
- 1 package Airheads Xtremes (optional)
- Water
Instructions
- Warm your choice of flavor Airheads in the palm of your hand rolling it into a ball.
- Flatten the ball with a wooden rolling pin and roll it until your mini ornament will fit over the flattened piece of Airheads candy.
- Press the metal cookie cutter into the candy until it cuts through to the back.
- Gently push the shape through the cookie cutter and set aside on a piece of freezer paper.
- Repeat once or twice more with the remaining piece of Airheads.
- Cut 24 mini Airheads candy ornaments.
- Push a thick embroidery needle or wooden skewer through the top of each ornament to make a very small hole so the ornament can be hung with an ornament hook.
- Cut pieces of contrasting colored Airheads to decorate each Airheads ornament.
- Embellish with strips of Airheads Xtremes if desired.
- Trace each cookie cutter shape on a piece of freezer paper. You will need one freezer paper shape for each ornament made.
- Dampen the back of each Airheads ornament with a finger dipped in water.
- Place a freezer paper cut out that corresponds with the ornament shape, shiny side down on the back of the ornament. Trim if needed. Set ornament down on another piece of freezer paper to air dry. Repeat for each ornament. Allow to air dry a couple of hours or overnight.
- Using the Black Edible Ink marker write a number on each ornament starting with number 1 and ending with number 24. Allow ink to dry before handling.
- Push an ornament hook through the hole at the top of each ornament. Repeat with all the remaining ornaments.
- Hang your Airhead Advent Ornaments from a twig tree or mini artificial Christmas tree.
- Enjoy each corresponding numbered ornament starting with number one of the 1st day of December to count down the days until Christmas Eve.


Dorothy at Shockingly Delicious
How stinkin' cute is that!
Arlene Mobley
Dorothy Thank you!