Bubbles Party Favors
Bubbles are a favorite of kids, and they are also really cheap to buy and easy to personalize as party favors.
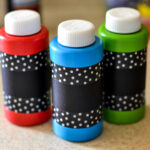
Yield: 12 bottles
Materials
- 12 small Dollar Tree bottles of Bubbles or mini Party Store bubbles
- 2 sheets sheets of 12 x 12 cardstock
- 3 rolls Washi Tape in coordinating colors
- 1 inch circle punch
- 1 roll double-sided tape or a tape roller
- 2 sheets scrapbook paper to match your theme
- 1 package gem stickers optional
- 1 scissor or paper cutter
Instructions
- Measure the width of the area on the bubble bottle that the label covers and cut out a strip of cardstock down one edge of the 12 x 12 sheet of cardstock.
- Fold the strip of cardstock in half along the length and cut in half. Each strip of cardstock will cover two bottles of bubbles with an overlap.
- Cut the rest of the cardstock into strips and then cut those in half. One sheet of cardstock will cover 9 bubble bottles. Cut two strips off the second piece of 12 x 12 cardstock. Don't worry if the edges aren't cut perfectly. The washi tape will hide it.
- I used a scrapbook tape roller but you can use any double-sided tape you have. I wouldn't suggest using any type of glue for this project because any lumps from the dry glue will be visible.
- Working with one strip of cardstock at a time run one or two strips of double-sided tape down the center of the card stock paper. Then run a short strip of double-sided tape one each short edge of the cardstock as close to the edge as possible.
- Center the strip of paper on a bubble bottle and wrap the card stock around the bottle making sure one edge overlaps the other. Apply pressure along the area on the bottle where the tape is on the back end to make sure the tape has adhered to the bottle.
- Take the washi tape and starting on one edge of the cardstock adhere to tape to the edge of the card stock. On the bubbles, I bought the area for the label was sunken so I just used the edge of the plastic bottle as a guide. If your bubble bottles are not like this use the edge of the cardstock as a guide. Overlap the edge of the washi tape. Repeat with the other side of the bottle.
- Repeat with the remaining bottles of bubbles.
